Thursday, June 27, 2013

KM: การใช้งาน Jmeter ทำสร้าง data test ใน database

Problem

ในการทดสอบโปรแกรมเพื่อดูว่า sql statement ที่เราใช้มีประสิทธิภาพดีรึเปล่า สิ่งนึงที่เราต้องการคือ data test ที่ค่อนข้างเยอะ ดังนั้นเราจะมา adapt ใช้ Apache Jmeter มาสร้างข้อมูลใน database

Assumption

1. จากที่ใช้เวลาหาข้อมูลเครื่องมือสำหรับ insert test data มานิดหน่อยยังไม่พบแบบที่ต้องการใช้งาน ซึ่งจริงๆ แล้วน่าจะมีที่ดีกว่า Jmeter, user friendly กว่า, เร็วกว่า
2. Jmeter version ที่ใช้คือ 2.8
3. Database ที่ใช้คือ Oracle Database 11g Express Edition

Throubleshooting

Logic คร่าวๆ ของการทำใช้ Jmeter ทำการสร้าง data test ใน database คือกำหนด insert statement โดยใน statement ต้อง set auto comment = false เพื่อลด overhead ที่เกิดจากการ commit ทุกๆ statement จากนั้นกำนหดให้มีการ commit ทุกๆ X records ขึ้นกับความเหมาะสม

ขั้นตอนการทำมีดังนี้

1. เปิด Jmeter

2. click ขวาที่ Test Plan เลือก Add > Thread (Users) > Thread Group


3. click ขวาที่ Thread Group ที่สร้างจากข้อ 2 เลือก Add > Config Element > Counter สร้างตัวแปร counter เพื่อให้ทำการนับจำนวน statement โดยในที่นี้จะให้ commit ทุกๆ 1000 records


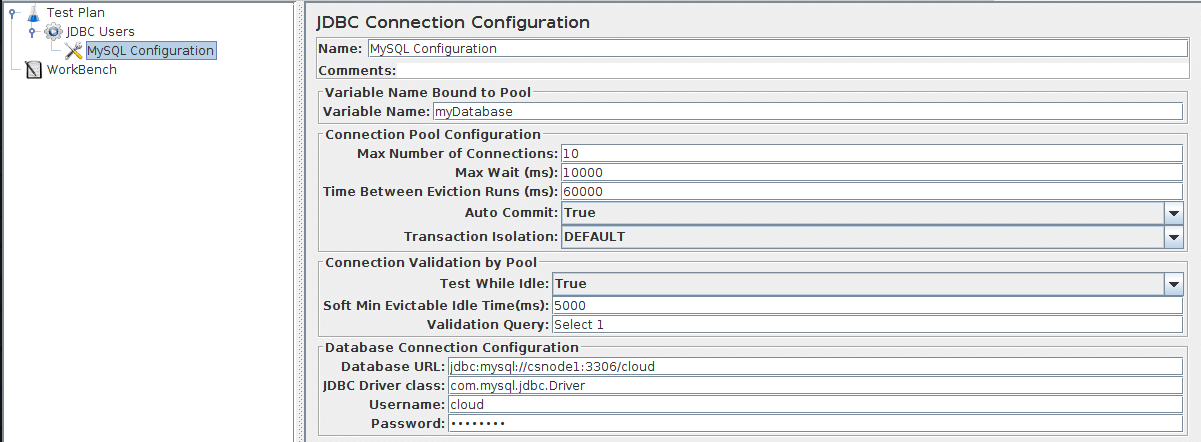
4. click ขวาที่ Thread Group เลือก Add > Config Element > JDBC Connection Configuration เพื่อสร้าง connection profile ในการต่อไปยัง database
  • Note: ตั้งค่า Auto Commit เป็น False เพื่อสั่ง commit เอง

5. เลือกที่ Test Plan ทำการเพิ่ม jdbc driver jar ทำได้โดยใน section "Add directory or jar to classpath" กดปุ้ม Browse จากนั้นเลือก jar file ที่ต้องการ กดปุ่ม Open ทั้งนี้ขึ้นกับ jdbc driver class ที่ใช้ในข้อ 4


6. click ขวาที่ Thread Group เลือก Add > Sampler > JDBC Request เพื่อทำการ config sql statement ที่จะใช้ในการสร้าง data test โดยสามารถ customize ได้หลายแบบ ดูได้จาก manual ใน Appendix

7. click ขวาที่ Thread Group เลือก Add > Logic Controller > If Controller เพื่อสร้างเงื่อนไขในการ commit transaction

8. click ขวาที่ If Controller เลือก Add > Sampler > JDBC Request จากนั้นเลือก Query Type เป็น Commit


Conclusion

จากการทดสอบพบว่าใช้งานได้ดีระดับหนึ่ง เนื่องจากสามารถ customize ได้หลายส่วน และสามารถกำหนด concurrence thread เพื่อเพิ่มความเร็วในการ insert data ได้

Appendix


18.1.3 JDBC Request

This sampler lets you send an JDBC Request (an SQL query) to a database.
Before using this you need to set up a JDBC Connection Configuration Configuration element
If the Variable Names list is provided, then for each row returned by a Select statement, the variables are set up with the value of the corresponding column (if a variable name is provided), and the count of rows is also set up. For example, if the Select statement returns 2 rows of 3 columns, and the variable list is A,,C , then the following variables will be set up:
A_#=2 (number of rows)
A_1=column 1, row 1
A_2=column 1, row 2
C_#=2 (number of rows)
C_1=column 3, row 1
C_2=column 3, row 2

If the Select statement returns zero rows, then the A_# and C_# variables would be set to 0, and no other variables would be set. Old variables are cleared if necessary - e.g. if the first select retrieves 6 rows and a second select returns only 3 rows, the additional variables for rows 4, 5 and 6 will be removed.
Note: The latency time is set from the time it took to acquire a connection.
Control Panel


Parameters
Attribute Description Required
Name Descriptive name for this sampler that is shown in the tree. No
Variable Name Name of the JMeter variable that the connection pool is bound to. This must agree with the 'Variable Name' field of a JDBC Connection Configuration. Yes
Query Type Set this according to the statement type:
  • Select Statement
  • Update Statement - use this for Inserts as well
  • Callable Statement
  • Prepared Select Statement
  • Prepared Update Statement - use this for Inserts as well
  • Commit
  • Rollback
  • Autocommit(false)
  • Autocommit(true)
  • Edit - this should be a variable reference that evaluates to one of the above
Yes
SQL Query SQL query. Do not enter a trailing semi-colon. There is generally no need to use { and } to enclose Callable statements; however they mey be used if the database uses a non-standard syntax. [The JDBC driver automatically converts the statement if necessary when it is enclosed in {}]. For example:
  • select * from t_customers where id=23
  • CALL SYSCS_UTIL.SYSCS_EXPORT_TABLE (null,?, ?, null, null, null)
    • Parameter values: tablename,filename
    • Parameter types: VARCHAR,VARCHAR
  • The second example assumes you are using Apache Derby.
Yes
Parameter values Comma-separated list of parameter values. Use ]NULL[ to indicate a NULL parameter. (If required, the null string can be changed by defining the property "jdbcsampler.nullmarker".)
The list must be enclosed in double-quotes if any of the values contain a comma or double-quote, and any embedded double-quotes must be doubled-up, for example:
"Dbl-Quote: "" and Comma: ,"
There must be as many values as there are placeholders in the statement.
Yes, if a prepared or callable statement has parameters
Parameter types Comma-separated list of SQL parameter types (e.g. INTEGER, DATE, VARCHAR, DOUBLE). These are defined as fields in the class java.sql.Types, see for example: Javadoc for java.sql.Types . [Note: JMeter will use whatever types are defined by the runtime JVM, so if you are running on a different JVM, be sure to check the appropriate document] If the callable statement has INOUT or OUT parameters, then these must be indicated by prefixing the appropriate parameter types, e.g. instead of "INTEGER", use "INOUT INTEGER". If not specified, "IN" is assumed, i.e. "DATE" is the same as "IN DATE".
If the type is not one of the fields found in java.sql.Types, versions of JMeter after 2.3.2 also accept the corresponding integer number, e.g. since INTEGER == 4, you can use "INOUT 4".
There must be as many types as there are placeholders in the statement.
Yes, if a prepared or callable statement has parameters
Variable Names Comma-separated list of variable names to hold values returned by Select statements, Prepared Select Statements or CallableStatement. Note that when used with CallableStatement, list of variables must be in the same sequence as the OUT parameters returned by the call. If there are less variable names than OUT parameters only as many results shall be stored in the thread-context variables as variable names were supplied. If more variable names than OUT parameters exist, the additional variables will be ignored No
Result Variable Name If specified, this will create an Object variable containing a list of row maps. Each map contains the column name as the key and the column data as the value. Usage:
columnValue = vars.getObject("resultObject").get(0).get("Column Name");
No
See Also:

Versions of JMeter after 2.3.2 use UTF-8 as the character encoding. Previously the platform default was used.

Ensure Variable Name is unique accross Test Plan.

Wednesday, May 29, 2013

KM: JEE Series - การประยุกต์ใช้ Web Service Handler Chain


อะไรคือ Web Service Handler Chain

มันคือ interceptor pattern ที่ถูก implement ใน Web Service ทำหน้าที่ในการดักจับ request / response ระหว่าง client - service provider ดังนั้นจะมี 2 ขา คือ inbound message และ outbound message หากพิจารณาจาก client การเรียกไปยัง service provider จะเป็น outbound message และสิ่งที่ได้รับกลับมาจาก service provider ก็จะเป็น inbound message ในทางกลับกันถ้าพิจารณาจาก service provider การเรียกเข้ามาจะเป็น inbound message และสิ่งที่ตอบกลับไปจะเป็น outbound message


การนำไปประยุกต์ใช้งาน

  • client / service provider: การทำ logging facade ข้อดีคือเป็นการ decoupling code ในส่วนการทำ logging และ business logic ออกจากกัน ปัญหาที่มักจะพบบ่อยในการใช้ tool เพื่อ generate client library มาใช้งานคือหาก request / response ที่ส่งมาไม่สามารถทำ xml binding ได้ จะไม่สามารถตรวจสอบว่าค่าไหนที่ไม่ถูกต้อง วิธีนึงคือ log message เพือตรวจสอบว่าส่งอะไรเข้ามา (แต่มีข้อแม้คือต้อง well-form)
  • service provider: การทำ customize authentication / authorization อันที่จริงใน web service รองรับ WS-Security อยู่แล้ว แต่หาก requirement ในการทำ AA มันซับซ้อนก็สามารถ implement ได้ใน layer ของ Chain Handler
  • client: การทำ customize soap header สามารถเพิ่ม soap element ใน soap header ได้ขึ้นกับ service provider specification

ข้อจำกัดในการพัฒนา


  1. ตัวอย่างจะใช้ oracle weblogic workshop 10.3 ดังนั้นจะมี bundle jar library ในการพัฒนา JEE อยู่แล้ว หากพบว่าขาด library ตัวไหนก็ลองหา download มาเอง
  2. ตัวอย่างไม่รวมในส่วนการ generate stub code ซึ่งในที่นี้จะใช้ Web Service version 2.0 แบบ jax-ws อาจต้องมีการเปลี่ยนแปลง package นิดหน่อย แต่ concept โดยรวมเหมือนกัน


ขั้นตอนการพัฒนา

1. สร้าง Web Service SOAPHandler ขึ้นมา โดย method ที่ต้องไป implement หลักๆ จะเป็น handleMessage(SOAPMessageContext context) ซึ่งจะเป็น interceptor เวลามี inbound / outbound message ในที่นี้จะทำตัวอย่าง logging facade จึงสร้าง constructor โดยส่ง logger object มา

 
 import javax.xml.soap.Name;  
 import javax.xml.soap.SOAPElement;  
 import javax.xml.soap.SOAPEnvelope;  
 import javax.xml.soap.SOAPHeader;  
 import javax.xml.soap.SOAPHeaderElement;  
 import javax.xml.soap.SOAPMessage;  
 import javax.xml.soap.SOAPPart;  
 import javax.xml.ws.handler.MessageContext;  
 import javax.xml.ws.handler.soap.SOAPHandler;  
 import javax.xml.ws.handler.soap.SOAPMessageContext;  
 import org.apache.log4j.Logger;  
 public class IBSOAPHandler implements SOAPHandler<SOAPMessageContext> {  
      private Logger logger = null;  
      public IBSOAPHandler(Logger logger)  
      {  
           super();  
           this.logger = logger;   
      }  
      @Override  
      public Set getHeaders() {  
           return null;  
      }  
      @Override  
      public void close(MessageContext context) {  
      }  
      @Override  
      public boolean handleFault(SOAPMessageContext context) {  
           return false;  
      }  
      @Override  
      public boolean handleMessage(SOAPMessageContext context) {  
     return true;  
      }  
 }  

2. ทำการ check message direction
        Boolean outboundProperty =
            (Boolean) context.get(MessageContext.MESSAGE_OUTBOUND_PROPERTY);
        if (outboundProperty.booleanValue()) {
            logger.info("Outbound message: ");
        }
        else
        {
            logger.info("Inbound message: ");
        }

3. อ่านค่า SOAP Message จาก SOAP Context
         SOAPMessage m = context.getMessage();

4. แปลงค่า SOAP Message ให้เป็น String เพื่อส่งไปยัง log4j ให้เขียนลง file
 private String printSource(SOAPMessage message)
 {
  try 
  {
   ByteArrayOutputStream baos = new ByteArrayOutputStream();

   message.writeTo(baos);
   
   String soapMessage = baos.toString(); 
   
   baos.close();
   
   return soapMessage;
  } 
  catch (Exception e) 
  {
   logger.error("Error while print soap message", e);
  }
  
  return null;
 }

5. หน้าตาก็จะออกมาแบบนี้
 import javax.xml.soap.SOAPElement;  
 import javax.xml.soap.SOAPEnvelope;  
 import javax.xml.soap.SOAPHeader;  
 import javax.xml.soap.SOAPHeaderElement;  
 import javax.xml.soap.SOAPMessage;  
 import javax.xml.soap.SOAPPart;  
 import javax.xml.ws.handler.MessageContext;  
 import javax.xml.ws.handler.soap.SOAPHandler;  
 import javax.xml.ws.handler.soap.SOAPMessageContext;  
 import org.apache.log4j.Logger;  
 public class IBSOAPHandler implements SOAPHandler<SOAPMessageContext> {  
      private Logger logger = null;  
      public IBSOAPHandler(Logger logger)  
      {  
           super();  
           this.logger = logger;   
      }  
      @Override  
      public Set getHeaders() {  
           return null;  
      }  
      @Override  
      public void close(MessageContext context) {  
      }  
      @Override  
      public boolean handleFault(SOAPMessageContext context) {  
           return false;  
      }  
      @Override  
      public boolean handleMessage(SOAPMessageContext context) {  
     Boolean outboundProperty =  
       (Boolean) context.get(MessageContext.MESSAGE_OUTBOUND_PROPERTY);  
        SOAPMessage m = context.getMessage();  
     if (outboundProperty.booleanValue()) {  
          logger.info("Outbound message: " + this.printSource(m));  
     }  
     else  
     {  
       logger.info("Inbound message: " + this.printSource(m));  
     }  
     return true;  
      }  
      private String printSource(SOAPMessage message)  
      {  
           try   
           {  
                ByteArrayOutputStream baos = new ByteArrayOutputStream();  
                message.writeTo(baos);  
                String soapMessage = baos.toString();   
                baos.close();  
                return soapMessage;  
           }   
           catch (Exception e)   
           {  
                logger.error("Error while print soap message", e);  
           }  
           return null;  
      }  
 }  

Reference

Note

การทำงานในลักษณะ interceptor ที่พบบ่อยอีกอันคือ servlet filter และพวก spring aop ดังนั้นการประยุกต์ใช้งานจึงคล้ายๆ กัน

Friday, March 22, 2013

KM: การใช้งาน google mail (gmail)

การใช้งาน google mail (gmail)

(ใช้งานคู่กับ gmail standard view)

1. (Mail) สร้าง Label เพื่อจัดกลุ่ม E-mail

ประโยชน์: ใช้แยก E-mail เพื่อให้ง่ายในการค้นหา

ขั้นตอน:
  • เลือก "create new label" จาก navigation panel (ซ้ายมือ)
  • ใน popup New Label ให้ใส่ "label name" และเลือก "Nest label under" กรณีต้องการจัด hierachy
  • โดย default label จะมีสีเทา ถ้ามีหลายๆ label จะดูยาก (จริงๆ คือไม่สวย) สามารถเปลี่ยนสีได้โดยเลือกลูกศรด้านขวามือของ label แล้วจะมี popup ให้เลือกสี

  • ในการใช้งานให้เลือกที่ label ที่ต้องการเพื่อเข้าถึง E-mail และยังสามารถค้นหา E-mail ภายใต้ label นั้นๆ ได้
  • เปรียบเทียบระหว่างไม่ใช้และใช้งาน label
Before: Un-categorised E-mail

After: Categorised E-mail


2. (Tasks) ใช้งาน Create Task คู่กับ E-mail

ประโยชน์: สร้าง Task ที่เกี่ยวข้องกับ E-mail เพื่อใช้อ้างอิง
ขั้นตอน:
  • เปิด E-mail ที่ต้องการ
  • เลือก More > Add To Tasks จาก Action Panel
  • สามารถเข้าไปเพิ่มรายละเอียดของ task นั้นๆ โดยเลือกที่ Tasks list ในที่นี้จะสามารถระบุ Due date ของ task ได้ แต่ยังไม่มีการแจ้งเตือน (เด๋วก็มี)
  • ใช้งานผ่าน short key ตาม link นี้

3. (Contacts) สร้าง contact group

ประโยชน์: ลดเวลาและไม่ต้องจำ E-mail account ที่เกี่ยวข้องเวลาจะส่ง E-mail
ขั้นตอน:
  • เปลี่ยน view เป็น "Contacts"
  • เลือก "New Group..." ใส่ข้อมูล group name
  • สามารถใส่ E-mail เข้า contact group ได้ 2 วิธี
    • เลือก group ที่สร้างไว้ จากนั้นเลือก "Add to group" จาก Action Panel แล้วใส่ E-mail account และกดปุ่ม "Add"
    • จากหน้าหลัก เลือก E-mail account ที่ต้องการ จากนั้นเลือก "Groups" จาก Action Panel และเลือก contact group ที่ต้องการ กดปุ่ม "Apply"


Sunday, March 3, 2013

KM: Design Pattern - Model View Controller

Context

ในการพัฒนา software ที่เกี่ยวข้องกับการแสดงผลของข้อมูล ไม่ว่าจะเป็น window base / web base / mobile base (อันนี้เรียกเอง) ปัญหาที่พบมากคือส่วนแสดงผลผู้ใช้ (User Interface) มักไม่อยู่นิ่ง ยิ่งเป็นพวกทำ personalize หรือ multilingual ด้วยแล้ว หากไม่ได้มีการออกแบบให้รองรับแต่แรก มันจะเป็นอะไรที่น่าปวดหัวมาก

Problem

ปัญหาก็คือจะทำยังไงให้แต่ละส่วนมันแยกกัน (decoupling) เพื่อที่หากมีการเปลี่ยนแปลงในส่วนหนึ่งส่วนใด มันจะได้ง่ายแก่การแก้ไขและกระทบส่วนอื่นให้น้อยที่สุด

Forces


หากดูจาก Java Blue Print (http://www.oracle.com/technetwork/java/mvc-detailed-136062.html) มันจะอลังการมาก คือมีการพูดถึง software ที่ค่อนข้างจะใหญ่ มีความต้องการนำเอาข้อมูลไปแสดงผลหลายแบบ มีทั้ง HTML, WML, JSF, Swing, Web Services etc. แต่ถ้ามาดูใน software ที่ขนาดเล็กลงมาหน่อย สิ่งที่ผลักดันให้เกิดการแก้ปัญหาดังกล่าวมาจาก

  • ส่วนแสดงผลผู้ใช้ (User Interface) มักจะมีการเปลี่ยนแปลงบ่อยกว่าส่วนประมวลผล (Business Logic) หากมันรวมอยู่ด้วยกัน เมื่อมีการแก้ไขส่วนแสดงผลผู้ใช้อาจเกิดข้อผิดพลาดที่ไม่ได้ตั้งใจขึ้นกับส่วนประมวลผลได้
  • ส่วนแสดงผลผู้ใช้มีรูปแบบหลากหลาย แต่มาจากข้อมูลเดียวกัน
  • ส่วนแสดงผลผู้ใช้และส่วนประมวลผลมักจะต้องใช้ developer ที่มี skill แตกต่างกัน จึงดีกว่าหากสามารถแยกทั้งสองส่วนมาพัฒนาโดย developer ที่ชำนาญด้านนั้น


Solutions

MVC (Model-View-Controller) จึงเป็นทางเลือกหนึ่งในการออกแบบ software โดยไม่ได้จำกัดที่ภาษาใดหรือ platform ใด ใน java ก็สามารถเอา MVC ไปใช้ได้ทั้ง JEE และ JSE (http://www.oracle.com/technetwork/articles/javase/index-142890.html) เพียงแต่ใน JEE มีการทำ application framework ที่ implement ตาม MVC มาให้เรียกใช้ แต่ใน JSE ต้อง implement เอง (อาจไม่ update เนื่องจากไม่ได้ติดตามในส่วน thick client มานานแล้ว ที่เคยทำมาก็สมัย swing - -") ก่อนจะงงว่าบ่นอะไร มาดูความหมายของแต่ละส่วนใน MVC

Model - เป็นส่วนเก็บข้อมูลที่จะต้องนำมาแสดงผลและข้อมูลที่รับมาจากผู้ใช้ รวมถึงการประมวลผลข้อมูล (business logic) ทั้งนี้ขึ้นกับความซับซ้อนของ software อาจเป็น single tier, two tier, three tier หรือ multi tier ก็ได้
View - เป็นส่วนที่นำ Model มาแสดงผล (display) ให้กับผู้ใช้
Controller - เป็นส่วนสร้าง Model และควบคุม Model และ View ให้ทำงานร่วมกัน ตาม user input


Example


Credit

Friday, December 14, 2012

KM: เรื่องมันมีอยู่ว่า - ต้องส่ง email ให้ตรงเวลาเป๊ะ

เรื่องมันมีอยู่ว่า

เมื่อวาน ผบ ไป dinner กับเพื่อนสาว พูดคุยกันถึงกระเป๋ายี่ห้อนึง กำลังเป็นที่ต้องการของสาวๆ ถึงขนาดซื้อขายกันกำไร 100% O_o สาเหตุก็มาจาก คนขายมันเก่งการตลาด จำกัดจำนวนสินค้าที่จะขาย และที่สำคัญต้องส่ง email สั่งซื้อตามเวลาที่คนขายกำหนด!!! (โอ้แม่เจ้า มันจะอะไรขนาดนั้น) เป็นที่โจษจันว่าการที่จะจองได้สำเร็จ ต้องเล็งเวลาส่งเป๊ะๆ ถึงขั้น millisecond กันทีเดียว

เอาละกลับเข้าเรื่อง จะทำไงกับโจทย์ที่ได้รับมา

  • ถึกโหมด นั่งอดตาหลับขับตานอนส่ง mail ตามเวลานั้น แต่ขืนทำแบบนั้น เสียชื่อ programmer หมด ต้องหาทางที่มันเท่กว่านี้
  • googling ซิ ใน internet คงมี solution ที่คนอื่นเค้าทำกัน (อิโถ่ programmer  เค้าทำงานกันแบบนี้ใช่มั๊ย) นั่นไงเจอละ มี web รับส่ง email ล่วงหน้าได้ 555 เสร็จตรู....แต่เด๋วก่อน แล้วมันปลอดภัยเหรอ จะส่ง email ได้มันต้อง authen กับ mail server นั่นหมายความว่าเราต้องให้ email account กับ password ไปด้วย ไม่ได้ๆ เป็น programmer ทั้งทีมาตกม้าตายโดนขโมย email แบบนี้ เสียชื่อ programmer หมด ต้องหาทางที่มันเท่กว่านี้
  • เขียนโปรแกรมส่ง email แม่งเล๊ย!!! ผูกกับ scheduler ซักตัว ให้ส่งตรงเวลา...เหมือนจะเท่ แต่ในฐานะที่เป็น senior programmer แล้ว ทำไมเราต้อง reinvent the wheel ด้วย มันต้องมีเครื่องมือที่จะช่วยเราได้ซิ เอะอะก็เขียนโปรแกรม เสียชื่อ senior programmer หมด ต้องหาทางที่มันเท่กว่านี้
  • นี่ไง Automator ช่วยเราได้ ไม่ต้องเขียนโปรแกรม แค่ลากแปะ ใส่ข้อมูล โอ้วววว มันช่างเลิศหรูสมกับเป็น senior programmer จริงๆ (ป่าวหรอก ขี้เกียจหาละ 555)

ลงมือปฏิบัติกัน

ใช้งานบน MacOS รุ่นเสือภูเขา

1. เปิดโปรแกรม Automator 


2. เริ่มต้นโปรแกรมจะให้เลือกว่าต้องการ trigger แบบไหน ให้เลือก Calendar Alarm


3. โปรแกรมสามารถค้นหา Action ที่ต้องการใช้งานจาก Library ในที่นี้ต้องการเขียน email เพื่อส่งก็เลือก New Mail Message แล้วลากไปวางที่ panel ขวามือ


4. กรอกข้อมูลใน New Mail Message และเลือก Account ว่าต้องการให้ส่งจาก mail account ไหน (แนะนำว่าควรจะเป็น mail server เดียวกันเพื่อลด delay ระหว่าง mail server)


5. เลือก Action Send Outgoing Messages โดยลากไปวางให้อยู่ถัดจาก New Mail Message


6. หลังจากที่กด Save โปรแกรมจะเรียก Calendar ให้มาตั้งว่าจะให้ Task ทำงานตอนไหน


7. กดไปที่ Task เพื่อแก้ไขวันเวลาที่ต้องการ


8. Tips: ด้วยข้อจำกัดที่การตั้งเวลาทำได้ในระดับนาที และพบว่าเวลาที่ส่ง email จาก Automotor มันจะ delay ประมาณนึง ดังนั้นหากต้องการให้ส่งเวลาที่ต้องการพอดีเป๊ะก็ต้องตั้งให้ task ให้ทำงานเร็วขึ้นแล้ว pause ไว้ให้สอดคล้องกับเวลาที่ delay ก็จะทำให้ส่งได้แม่นยำขึ้น


ผลการทดสอบ

พบว่าสามารถส่ง email ได้ในเวลาที่ต้องการเป๊ะ (ถึงระดับ second) แต่ด้วยข้อจำกัดอื่นๆ อาจทำให้เวลาที่ส่งเปลี่ยนแปลงได้ ที่เหลือก็ขึ้นกับดวงว่าจะสามารถจองกระเป๋าได้หรือไม่ ^^


Sunday, November 11, 2012

KM: WebLogic - การใช้งาน jconsole เพื่อ connect ไปยัง WebLogic JVM

การใช้งาน jconsole เพื่อ connect ไปยัง WebLogic JVM


Problem

jconsole สามารถใช้เป็นเครื่องมือในการ monitor jvm behavior ได้ในระดับหนึ่ง โดยแนวทางที่จะเสนอนี้เป็นการแก้ปัญหาการใช้ jconsole เพื่อไป monitor jmx component บน remote WebLogic Server (version 10.3.x) ซึ่งถึงแม้จะระบุ parameter เพื่อเปิด jconsole ขึ้นมา ก็ยังได้ error no permission

## Command to start jconsole for WebLogic Server
prompt>jconsole -J-Djava.class.path=%JAVA_HOME%/lib/jconsole.jar;%JAVA_HOME%/lib/tools.jar;C:/bea_103/wlserver_10.3/server/lib/wljmxclient.jar -J-Djmx.remote.protocol.provider.pkgs=weblogic.management.remote -debug

## Error message
Caused by: javax.naming.NamingException: Unhandled exception in lookup [Root exception is org.omg.CORBA.NO_PERMISSION:   vmcid: 0x0  minor code: 0  completed: No] at weblogic.corba.j2ee.naming.Utils.wrapNamingException(Utils.java:83) at weblogic.corba.j2ee.naming.ContextImpl.lookup(ContextImpl.java:232) at weblogic.corba.j2ee.naming.ContextImpl.lookup(ContextImpl.java:168) at javax.naming.InitialContext.lookup(InitialContext.java:392) at weblogic.management.remote.common.ClientProviderBase.makeConnection(ClientProviderBase.java:144) ... 6 more

จากที่ลองหาข้อมูล พบว่าเป็นเรื่องของการ mapping credential info ตอนที่ jconsole จะไป browse jndi tree เพื่อเข้าถึง jmx

Assumption

ปัญหาเกิดจากการใช้งาน WebLogic Server 10.3.0

Troubleshooting

  1. download ตาม link t3jconsole.jar
  2. สร้าง WebLogic full client jar ตาม command ด้านล่างก็จะได้ file ที่ชื่อว่า wlfullclient.jar
  3. เปิดใช้งาน jmx agent โดยสามารถ download file ที่เกี่ยวข้อง ตาม link jmx.zip -Dcom.sun.management.config.file=%SOME_PATH%/jmx/management.properties
  4. เปิด jconsole ด้วย command ตามด้านล่าง
    prompt>jconsole -J-Djava.class.path=C:/bea_103/wlserver_10.3/server/lib/t3jconsole.jar;%JAVA_HOME%/lib/jconsole.jar;%JAVA_HOME%/lib/tools.jar;C:/bea_103/wlserver_10.3/server/lib/wlfullclient.jar -J-Djmx.remote.protocol.provider.pkgs=fr.xebia.jmx.remote  -debug
  5. ใส่ input parameter เพื่อต่อไปยัง remote WebLogic
    Remote url=service:jmx:t3://[host]:[port]/jndi/weblogic.management.mbeanservers.runtime Username=usernamePassword=password
  6. ใส่ข้อมูล remote JVM
    ตัวอย่างหน้าการใช้งาน (ไม่ได้เปิดจาก remote JVM แต่เหมือนกัน)


Thursday, November 8, 2012

KM: JEE Series - การใช้งาน JPA caching

JPA Caching โดยใช้ Native Query

Problem

เนื่องจากต้องการทำ entity caching เพื่อ join ข้อมูลจาก 2 table โดยมีการจัด priority ของข้อมูลคือให้เอาจาก table แรกเป็นหลัก ถ้าไม่เจอให้ไปดึงข้อมูลจาก table สอง 

Assumption

พัฒนาโดยใช้
  • JPA 1.0
  • Hibernate 3
  • WebLogic Workshop 10.3

Troubleshooting

  1. เริ่มต้นด้วยการสร้าง Named Query จากเงื่อนไขของปัญหาข้างต้น จึงใช้ Native Query เพื่อ join 2 table เข้าด้วยกัน และเลือกข้อมูลจาก priority ของ table เป็นค่าส่งกลับไปใช้งาน โดยทำการระบุ hint ว่าจะทำ caching บน entity นี้


  2. สร้าง file ehcache.xml และวางตามตัวอย่าง


  3. config ค่า parameter สำหรับการทำ caching ในที่นี้ตั้ง TTL ไว้ที่ 60 วินาที


  4. แก้ไข persistence.xml เพื่อเปิดการใช้งาน caching โดยในที่นี้ใช้ ehcache library


  5. เพิ่ม backport-util-concurrent-3.0.jar และ ehcache-1.5.0.jar ใน server class path


  6. เรียกใช้งาน Named Query ที่สร้างไว้

Conclusion

จากการทดสอบ ได้ผลลัพธ์ออกมาถูกต้อง โดยดูจาก sql statement ที่แสดงออกใน console จะไม่พบ statement ที่ทำการ caching ไว้ แต่ใน JPA น่าจะมีวิธีทำที่ถูกต้องกว่านี้